Friday, 23 March 2012

Project 8: Painted Plates

Painting can be a tricky beast so when I came across this project on A Merry Mishap that involved paint pens, I was excited.  Surely it would be easier than mastering a paintbrush!  And for the most part it is easier thanks to Pebeo Porcelaine pens.  I tracked them down at Spotlight while Kate went on a mission to IKEA to source a variety of plates.


Inspiration for our designs came from book covers, Islamic Art books, Marimekko and even a children's colouring in book!  It was hard to take that first step in committing paint to porcelain but steady hand Kate was the bravest among us.  In no time at all, she had created three quirky plates featuring trees, flowers and a yellow bird.


Jess tackled more intricate lines designs and they really tested the perfectionist in her!  She discovered quickly that you could wipe off the paint easily before it dried or scratch it off later on down the track.  Her hypnotic designs certainly catch your eye!


I explored the world of ladybugs and pea pods for my plates but hit a creative wall when it came to the large brown platter.  It was only after the girls had packed up and gone home that I finally settled on a starting point.
We each took our plates home and, after letting them dry for 24 hours, we baked them for 35 minutes in a 150°C oven.  We learnt a few things along the way - the thicker pens give a more consistent colour than the thin pens, some colours are too dark for filler - so next time we plate up, it will be a breeze!
Amanda

Wednesday, 7 March 2012

Project 7: Yarn Block Printing


After an epic week involving too many sick children we rallied for Crafty Friday. I am so glad we did. These yarn blocks worked so well!


We were inspired by Modern Parents Messy Kids. And then all we needed was a trip to Eckersleys at Milton, some acrylic paints, nice 300gsm paper, different sized wood blocks, some yarn and jute and looked what we whipped up.


Amanda gave wrapping paper a go, using similar techniques and also using the ends of cardboard rolls and brown paper. I will make sure she gets us some photos to share. Now, to bed! Jess

Monday, 20 February 2012

Solo craftiness: dresses for little girls

Ok so I have the ongoing problem of finding dresses that cover the girls' shoulders from the sun but are still summery, pretty and easy for them to play in. Like the felt clip that started Crafty Fridays, I have paid way too much money for dresses in the past. I had a bit of a hunt around Etsy and found patterns for these dresses over at Too Sweets. They took me no more than 50 minutes - I think I spent more time in the fabric store! I think the girls' favorite part are the pockets and I am ok with that.
- Jess

Friday, 3 February 2012

Project 6: Vintage Tiered Cake Stands


I saw this idea in a beautiful vintage inspired craft book I got for Christmas, called 'Homemade Gifts Vintage Style' by Sarah Moore. We fossicked about in local op shops and an antique centre for old plates, saucers, and crystal glasses to use as stackers. Between us we managed to make 7 tiered cake stands in no time at all. It was really simple, and just required a strong glass glue and a steady hand. I practised with a couple of different types of glue on old china beforehand to test which ones were strongest, and ended up using a silicone based glue. You can actually see the glue a bit when the plates are empty, but once filled with sweets and cakes the glue wouldn't be visible. Now mine are sitting in an open cabinet and although I haven't used them yet, they look really pretty out on display. Jess has used hers already for her 4 year old daughter's 'Tea Party' themed birthday, and they looked so sweet. Kate.


PS. This is a photo taken at Jess's "Tea Party" themed birthday party, where the tiered cake stands were put to their first use. Although she didn't manage to get any decent photos of the cake stands heaving with delicious sweets, she did manage to get this photo of her son, who decided that the best thing to do with a homemade pinata once it's been beaten open, is wear it.

Friday, 13 January 2012

Project 5: Mod Podge Trays


Whenever my grandmother would come to stay, my mother would always serve her breakfast in bed on a beautiful tray. A functional, attractive tray is surprisingly hard to come by so when Kate spotted these pine ones in Spotlight, we decided to tackle our first Mod Podge project following the Prudent Baby Tutorial. I had been keeping the pull-out posters from my Frankie magazines and this Victorian bird lady by Marjorie Liucci was always destined for greatness. Kate found her pattern in a book of decadent Art Nouveau wrapping paper while Jess bought some Art Deco pure cotton from Funky Fabrix.


We started with Jess's leftover house paint as our base. We applied a layer of Mod Podge and then smoothed on the paper. I had a bit of trouble with my paper as it wasn't as thick as the wrapping paper - lots of Mod Podge and pressing down knocked this problem on the head.

When the paint and MP had all dried, the trays were still sticky. So Kate sourced some Acrylic Sealer which did the trick. Three crafty trays ready for display or to entertain! 
Amanda


Ready for a tea party.

Friday, 30 December 2011

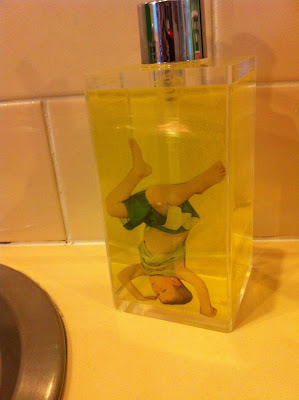
Solo Craftiness: funny handwash


I saw this idea on Pinterest. Oh Pinterest, how I love/hate you - you waste so much of my time, yet what a way to timewaste! Sigh.

To make these, take photos of your kids in funny "let me out of here!!" poses, and print the photos onto paper. Cut out neatly around the outline of your child's picture, then take this little fragile paper figure to a copy shop and get them to copy it onto overhead projector (OHP) film, also called transparency paper I think. Cut this film to fit your handwash bottle, roll it up, slip it in, and fill the bottle with clear handwash. I bought clear refillable pump bottles at Freedom Furniture, but it also works just buying any clear handwash bottle from the supermarket and peeling off the stickers. Kate.


Thursday, 15 December 2011

Project 4: Pendant Lighting


So you must have seen these doily pendants, right?? They were everywhere, so we couldnt resist any longer. We kind of collated the how-tos from places like Real Living and Apartment Therapy, applied a bit of common sense and voile! We found the doilies on ebay (thank you wattleinspireyou). We tried a few places looking for an elusive round balloon, but we had no luck. Any ideas?? In the end we used your standard helium quality ones. I think the bigger one was almost too big, it has collapsed on itself a little. Nevertheless they look quite pretty. Too pretty for my guest bathroom???


Amanda mixed it up with some pendants made of wood veneer strips which didn't go exactly to plan (strips too thin??) but they turned out beautifully, I think. Just scrumptious in that bowl! It was a great idea to go with a lot of smaller ones rather than one big one. Nice save! Jess.